From the Oracle Communication User Documentation,


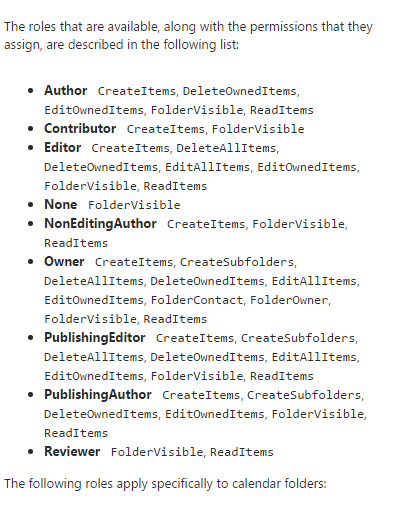
Exchange has the following delegate options.
You should now see the problem about how you move from legacy to target and keep everyone happy.
Basically, you cannot possibly keep everyone happy if you try to migrate delegate permissions from Oracle to Exchange. The only sane solution is to let users set delegates themselves post-migration.
While it is possible to set Delegates via PowerShell in Exchange via Add-MailboxFolderPermission, Sumatra does not recommend migrating legacy delegate lists.
- The access
model between legacy and target system are different enough that
any mapping is a “best guess.”
While this is fine for many users, it will lead to dissatisfaction
among an undetermined subset. And
long experience with migrations has shown us that user communities are
happier with a migration with clear rules and expectations universally
applied.
- Migrating
delegates automatically propagates a situation of “maximum access.” Now is a perfect time for end users to
review who has access to their calendars and re-think it.
- Use it as a
primary incentive to get users training on the new system.
Exception to the rule: Zimbra to Microsoft Exchange.
Since Zimbra consciously decided to rip-off emulate as much Microsoft functionality as explicitly and exactly as it could, you have a higher chance of success here. But please see comment #2 above about propagating a culture of "maximum access."
BEWARE:
Migrating Zimbra permissions to Exchange does not automatically set up menus for user access via Outlook or OWA!
You will likely perpetuate security issues for users who have changed roles and should no longer have access to some accounts! Your migration is the best time to review all of these!
To extract Zimbra delegate permissions:
Zmmailbox will give permissions for any mailbox or calendar you want as follows
./zmmailbox -z -m jimi@sumatra.local gfg /Inbox
./zmmailbox -z -m jimi@sumatra.local gfg /Calendar

This also works for tasks and contacts.
To save to a text file append '> permissions.txt'
See: https://wiki.zimbra.com/wiki/Ajcody-User-Management-Topics
Permissions exist as per the following table:
r = read
w = write
i = insert
d = delete
x = accept/decline invitations
a = administer
To insert Zimbra permissions into Exchange:
Use:
Add-MailboxPermission in PowerShell
Add-MailboxFolderPermission -Identity jimi@sumatra.local -User zyg@sumatra.local -AccessRights Editor
This will give Zyg editor delegate access to Jimi's mailbox.
And of course, you will need to manipulate or edit the text file you originally extracted from Zimbra. But this is not beyond high school programming or scripting, people.
You can also delegate other folders like jimi@sumatra.local:\Calendar and so forth.
See also: How to use Powershell to set delegate for user mailbox in Exchange 2010 and Office 365
Again, just because you can migrate permissions does not mean you should.
Seriously talk this over.
Migrating Zimbra permissions to Exchange does not automatically set up menus for user access via Outlook or OWA!
You will likely perpetuate security issues for users who have changed roles and should no longer have access to some accounts! Your migration is the best time to review all of these!
To extract Zimbra delegate permissions:
Zmmailbox will give permissions for any mailbox or calendar you want as follows
./zmmailbox -z -m jimi@sumatra.local gfg /Inbox
./zmmailbox -z -m jimi@sumatra.local gfg /Calendar

This also works for tasks and contacts.
To save to a text file append '> permissions.txt'
See: https://wiki.zimbra.com/wiki/Ajcody-User-Management-Topics
Permissions exist as per the following table:
r = read
w = write
i = insert
d = delete
x = accept/decline invitations
a = administer
To insert Zimbra permissions into Exchange:
Use:
Add-MailboxPermission in PowerShell
Add-MailboxFolderPermission -Identity jimi@sumatra.local -User zyg@sumatra.local -AccessRights Editor
This will give Zyg editor delegate access to Jimi's mailbox.
And of course, you will need to manipulate or edit the text file you originally extracted from Zimbra. But this is not beyond high school programming or scripting, people.
You can also delegate other folders like jimi@sumatra.local:\Calendar and so forth.
Again, just because you can migrate permissions does not mean you should.
Seriously talk this over.