- Create a service account (in this example: Ex2007)
The Ex2007 account should NOT be a member of any of the Exchange Administrative Groups. Set your permissions in Default Domain Security Settings-User Rights Assignment-"Allow logon locally" for this user
Note: Exchange explicitly denies Impersonation for all accounts in those groups - All Exchange Servers should be members of Windows Authorization Access Group
- Determine if your users SMTP address is alias@FQDN. If it isn’t, you’ll have to impersonate using the User Principal Name (UPN). This should be defined as alias@FQDN.
- Set these five rights by running these commands in Exchange Management Shell
Add-ADPermission -Identity (get-exchangeserver).DistinguishedName -User (Get-User -Identity Ex2007 ¦ select-object).identity -AccessRights GenericAll -InheritanceType Descendents
Add-ADPermission -Identity (get-exchangeserver).DistinguishedName - User (Get-User -Identity Ex2007 ¦ select-object).identity -ExtendedRight ms-Exch-EPI-Impersonation
Add-ADPermission -Identity (get-exchangeserver).DistinguishedName - User (Get-User -Identity Ex2007 ¦ select-object).identity -ExtendedRight ms-Exch-EPI-May-Impersonate
Add-ADPermission -Identity (get-exchangeserver).DistinguishedName - User (Get-User -Identity Ex2007 ¦ select-object).identity -ExtendedRights Send-As
Add-ADPermission -Identity (get-exchangeserver).DistinguishedName - User (Get-User -Identity Ex2007 ¦ select-object).identity -ExtendedRights Receive-As
Note One: These grant permissions at the SERVER level. You can also grant permissions at the database, user, and contact-levels.
Note Two: If you have multiple servers, you must grant Impersonation at each server (or database). Exchange 2007 does not have any system-wide Impersonation permission capability. - If your CAS server sits behind a load-balancer, give the ms-Exch-EPI-Impersonation rights to the Ex2007 account for ALL CAS boxes behind the load-balancer. If your mailbox servers are on a machine other than the CAS servers, give ms-Exch-EPI-Impersonation rights for the Ex2007 account for ALL mailbox servers.
- Verify that the Ex2007 account has rights you've just granted:
Open Active Directory Sites and Services.
In the console tree, right-click Active Directory Sites and Services, point to View, and then click Show Services Node.
Expand the service node (e.g. Services/MS Exchange/First Organization/Admin Group/Exchange Admin Group/Servers.
You should see your CAS server(s) there. View “properties” for each CAS server, ensuring your service account is there, and under the privileges exchange Impersonation is checked (and not grayed out). See Figure 1.
If the permissions or account is not present, add it, and make sure the Impersonation, and Send-As, Receive-As boxes are checked.
Figure 1-Exchange service account impersonation properties
(Source: http://technet2.microsoft.com/windowsserver/en/library/d4e342bc-2e26-4bd1-ba9b-b5bf58b562081033.mspx?mfr=true) - Make sure you do not have accounts where permissions are not inherited (this often happens for accounts that are members of the "IT" group). If so, you’re going to need to explicitly grant permissions to members of that group or OU.)
- Strange things happen if you are trying to impersonate cross-forest. This suggests that the account doesn’t have sufficient rights to read AD.
- Verify that the service account (e.g., Ex2007) has those permissions set (Allow impersonation to Exchange Personal Information, send-as, receive-as) on the storage group and the mailbox store (see Figure 2 below.)
 Figure 2– Verify permissions at the Mailbox store
 - If you are on a test-server and are using the default security certificate, is that certificate put in the 'trusted root'?
Launch any secure page: e.g. for the server striper: https://striper/ews/exchange.asmx. When the certificate warning page appears, "Trust" the certificate, "View" the certificate, and use the "Install Certificate" wizard to "Place all certificates in the following store" (the store is the Trusted Root Certification Authorities). See Figure 2.
Figure 3–Placing the Certificate in the Trusted Root Cert Authority
Most sane human beings would try to verify all these permissions using Outlook Web Access. If you try this and get an error "You do not have permission to open this mailbox" check out KB Article 940846.
Thursday, August 30, 2007
Exchange 2007 Impersonation - Debugging Protocol
We've hit on many different reasons why service account fail to have Impersonation and Send-As, Receive-As rights set correctly. Here are some areas to check as you create a service-account and grant it Impersonation rights:
Wednesday, August 29, 2007
Outlook and Entourage in Exchange 2007
Quick note on the difference between Entourage and Outlook in Exchange 2007 environments:
Outlook clients need to point to the CAS. See: The Exchange 2007 Client Access Server (CAS) role
Entourage clients need to point at the back end 2007 servers. See: Using Entourage with Exchange 2007
Outlook clients need to point to the CAS. See: The Exchange 2007 Client Access Server (CAS) role
Entourage clients need to point at the back end 2007 servers. See: Using Entourage with Exchange 2007
Sunday, August 26, 2007
Setting Permissions for Migration into Exchange 2007
If you've been through a migration into Exchange or just reading up on the intricacies of the process, you've seen a recurring theme: Permissions.
In both Exchange 2003 and 2007 the first problem you're likely to run into is setting permissions properly to insert calendar server data during a migration. The necessary permissions have changed in the past with various roll-ups and service packs and will undoubtedly change in the future.
As of the current Exchange 2007 release, you must set GenericAll, Send-As, Receive-As, and Impersonation using the Exchange Management Shell.
The following examples will create an account called ex2007@lab.sumatra.local with appropriate permissions on server “myServerName.” Of course you can create your own service account and must use your lab or production domain name.
Add-ADPermission -Identity "CN=myServerName,CN=Servers,CN=Exchange Administrative Group (FYDIBOHF23SPDLT),CN=Administrative Groups,CN=First Organization,CN=Microsoft Exchange,CN=Services,CN=Configuration,DC=lab,DC=sumatra,DC=local" -User ex2007@lab.sumatra.local -AccessRights GenericAll -InheritanceType Descendents
Add-ADPermission -Identity "CN=myServerName,CN=Servers,CN=Exchange Administrative Group (FYDIBOHF23SPDLT),CN=Administrative Groups,CN=First Organization,CN=Microsoft Exchange,CN=Services,CN=Configuration,DC=lab,DC=sumatra,DC=local" -User ex2007@lab.sumatra.local -ExtendedRights Send-As
Add-ADPermission -Identity "CN=myServerName,CN=Servers,CN=Exchange Administrative Group (FYDIBOHF23SPDLT),CN=Administrative Groups,CN=First Organization,CN=Microsoft Exchange,CN=Services,CN=Configuration,DC=lab,DC=sumatra,DC=local" -User ex2007@lab.sumatra.local -ExtendedRights Receive-As
Add-ADPermission -Identity "CN=myServerName,CN=Servers,CN=Exchange Administrative Group (FYDIBOHF23SPDLT),CN=Administrative Groups,CN=First Organization,CN=Microsoft Exchange,CN=Services,CN=Configuration,DC=lab,DC=sumatra,DC=local" -User ex2007@lab.sumatra.local -extendedRight ms-Exch-EPI-May-Impersonate
Add-ADPermission -Identity "CN=myServerName,CN=Servers,CN=Exchange Administrative Group (FYDIBOHF23SPDLT),CN=Administrative Groups,CN=First Organization,CN=Microsoft Exchange,CN=Services,CN=Configuration,DC=lab,DC=sumatra,DC=local" -User ex2007@lab.sumatra.local -extendedRight ms-Exch-EPI-Impersonation.
You could also execute the commands this way:
Add-ADPermission -Identity "myServerName" -User ex2007@lab.sumatra.local -AccessRights GenericAll -InheritanceType Descendents
We add GenericAll because sometimes the service account needs additional permissions.
You should not add this account to any administrative groups, e.g., administrators, domain administrators, etc.
Impersonation in particular seems to be the source of a huge amount of problems.
Tuesday, August 07, 2007
Create user and resource accounts in your Exchange 2007 lab with Exchange Management Shell
Sumatra runs client data through a series of rigorous tests as part of our QA process. We insert client calendar into Exchange in our “sandbox” test lab during one phase of testing. This requires we build user and resource accounts in bulk. Our prior home-grown tools do not work in Exchange 2007 because Microsoft killed CDOEX in Exchange 2007. This gave us a chance to learn Exchange Management Shell (EMS) and rework our tools for public use.
The EMS vocabulary is obtuse, but not hard.
To create the accounts, you only need two steps:
Now, run Exchange Management Shell, and “cut and paste” these three commands:
Create a variable “Temp” that contains a password (if you want one)
$Temp = ConvertTo-SecureString "N0Pwd4U" -asPlainText –Force
Import the users. Remember that you will have to make at least three changes:
Finally, please note that in Exchange 2007 resources are disabled by default. Remember to enable the accounts. Also, for the test lab (and for the insertion), you should NOT set automatic processing of meeting requests (i.e. -automateprocessing:AutoAccept).
THANKS to sharp-eyed reader Vince for pointing out an error in one of our lines (corrected Oct. 4, 2007)!
The EMS vocabulary is obtuse, but not hard.
To create the accounts, you only need two steps:
- Export the account list (do resources and user accounts separately)
- Build the mailboxes.
First, create two CSV (export) files - one for resources, one for users.
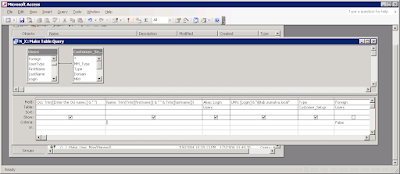
The script we wrote requires five columns of data – the OU, the descriptive name, the alias, the UPN, and the account type. You can build this file in Excel, or Sumatra customers can use data from the Users table. (If you’ve got a database v8.7.5.2+ from Sumatra, the query you can start with is called “N_X”.)
Here’s how each of the columns are defined:
- OU: “Users”
Note : If you have different OUs for your users and resources, remember to change them here. - Name: Trim(Trim([firstname]) & " " & Trim([lastname]))
- Alias: Login
- UPN: [Login] & "@lab.sumatra.local"
Note : Remember to change the lab.sumatra.local to your test lab domain - Type
Note : The criteria will be Individual OR Resource - Foreign (uncheck the show box, and apply a criteria of false)
Here’s a screen shot of the query:
If you are running MS Access, save the query, then right-hand click on the query name, and Export. (If you are running the N_X query, it produces a table because it “prompts” you for information. Export that table.) You want to export:
- As type “Text”,
- Enter the file name with an extension of .CSV. Select the export button.
- Output the fields as “Delimited”,
- The delimiter is a comma,
- Check “Include field Names on the First Row”, and
- Select the Text Qualifier as {none} - not quote (“)
- Select “Finish”
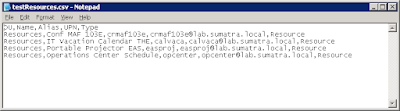
Modify the query, and repeat the export process for “resources”.
Here’s a sample export of resource account information
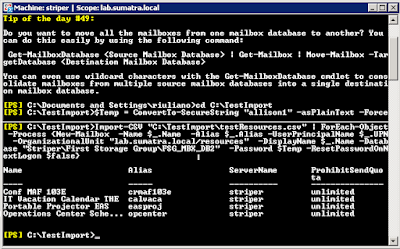
Now, run Exchange Management Shell, and “cut and paste” these three commands:
Create a variable “Temp” that contains a password (if you want one)
$Temp = ConvertTo-SecureString "N0Pwd4U" -asPlainText –Force
Import the users. Remember that you will have to make at least three changes:
- The “path” to the CSV file
- The Organizational Unit
- The Database Name
- (optional) The Password
Import-CSV "C:\Sumatra\UserExport\tmp_UserList.csv" ForEach-Object -Process {New-Mailbox -Name $_.Name -Alias $_.Alias -UserPrincipalName $_.UPN -OrganizationalUnit "lab.sumatra.local/client/Test" -DisplayName $_.Name -Database "Striper\First Storage Group\FSG_MBX_DB1" -Password $Temp -ResetPasswordOnNextLogon $false}
Import the resources. As above, remember to change the path, the OU, the DB Name.
Import-CSV "C:\Sumatra\UserExport\tmpResList.csv" ForEach-Object -Process {New-Mailbox -Name $_.Name -Alias $_.Alias -UserPrincipalName $_.UPN -OrganizationalUnit "lab.sumatra.local/resources" -DisplayName $_.Name -Database "Striper\First Storage Group\FSG_MBX_DB2" -Password $Temp -ResetPasswordOnNextLogon $false -Room:$True}
Here’s a screen shot of the results:
Finally, please note that in Exchange 2007 resources are disabled by default. Remember to enable the accounts. Also, for the test lab (and for the insertion), you should NOT set automatic processing of meeting requests (i.e. -automateprocessing:AutoAccept).
THANKS to sharp-eyed reader Vince for pointing out an error in one of our lines (corrected Oct. 4, 2007)!
Subscribe to:
Posts (Atom)