The EMS vocabulary is obtuse, but not hard.
To create the accounts, you only need two steps:
- Export the account list (do resources and user accounts separately)
- Build the mailboxes.
First, create two CSV (export) files - one for resources, one for users.
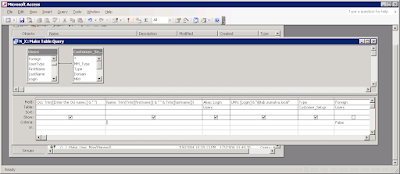
The script we wrote requires five columns of data – the OU, the descriptive name, the alias, the UPN, and the account type. You can build this file in Excel, or Sumatra customers can use data from the Users table. (If you’ve got a database v8.7.5.2+ from Sumatra, the query you can start with is called “N_X”.)
Here’s how each of the columns are defined:
- OU: “Users”
Note : If you have different OUs for your users and resources, remember to change them here. - Name: Trim(Trim([firstname]) & " " & Trim([lastname]))
- Alias: Login
- UPN: [Login] & "@lab.sumatra.local"
Note : Remember to change the lab.sumatra.local to your test lab domain - Type
Note : The criteria will be Individual OR Resource - Foreign (uncheck the show box, and apply a criteria of false)
Here’s a screen shot of the query:
If you are running MS Access, save the query, then right-hand click on the query name, and Export. (If you are running the N_X query, it produces a table because it “prompts” you for information. Export that table.) You want to export:
- As type “Text”,
- Enter the file name with an extension of .CSV. Select the export button.
- Output the fields as “Delimited”,
- The delimiter is a comma,
- Check “Include field Names on the First Row”, and
- Select the Text Qualifier as {none} - not quote (“)
- Select “Finish”
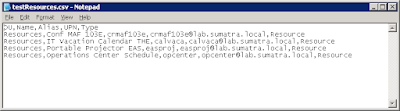
Modify the query, and repeat the export process for “resources”.
Here’s a sample export of resource account information
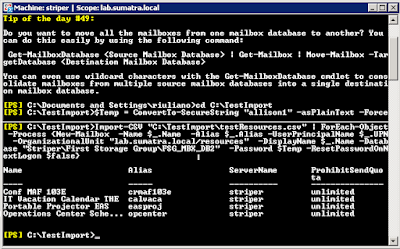
Now, run Exchange Management Shell, and “cut and paste” these three commands:
Create a variable “Temp” that contains a password (if you want one)
$Temp = ConvertTo-SecureString "N0Pwd4U" -asPlainText –Force
Import the users. Remember that you will have to make at least three changes:
- The “path” to the CSV file
- The Organizational Unit
- The Database Name
- (optional) The Password
Import-CSV "C:\Sumatra\UserExport\tmp_UserList.csv" ForEach-Object -Process {New-Mailbox -Name $_.Name -Alias $_.Alias -UserPrincipalName $_.UPN -OrganizationalUnit "lab.sumatra.local/client/Test" -DisplayName $_.Name -Database "Striper\First Storage Group\FSG_MBX_DB1" -Password $Temp -ResetPasswordOnNextLogon $false}
Import the resources. As above, remember to change the path, the OU, the DB Name.
Import-CSV "C:\Sumatra\UserExport\tmpResList.csv" ForEach-Object -Process {New-Mailbox -Name $_.Name -Alias $_.Alias -UserPrincipalName $_.UPN -OrganizationalUnit "lab.sumatra.local/resources" -DisplayName $_.Name -Database "Striper\First Storage Group\FSG_MBX_DB2" -Password $Temp -ResetPasswordOnNextLogon $false -Room:$True}
Here’s a screen shot of the results:
Finally, please note that in Exchange 2007 resources are disabled by default. Remember to enable the accounts. Also, for the test lab (and for the insertion), you should NOT set automatic processing of meeting requests (i.e. -automateprocessing:AutoAccept).
THANKS to sharp-eyed reader Vince for pointing out an error in one of our lines (corrected Oct. 4, 2007)!
No comments:
Post a Comment